


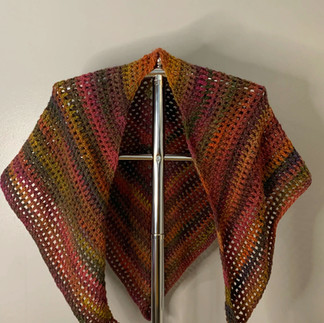


This photo tutorial is a beginner-friendly introduction to triangle shawls
The very easy shawl pattern works up quickly in Aran weight yarn. It uses double crochet stitches in a simple and easy-to-remember one-row repeat.
As this tutorial is for beginners, the pattern rows have been broken down over multiple lines and additional explanatory notes have been added. Stitch names in the photo tutorial have been linked back to the stitch names and descriptions in the stitch key
There's lots of information here that an experienced crocheter may not need. If you would like to go straight to the pattern without additional photos or notes, you can click here: The Woodland pattern.
PDF versions of the patterns will be available to download for a small fee from Ravelry and Etsy. The PDF files can be printed or downloaded into PDF reader applications giving you the option to annotate and highlight the pattern as you work. Also, by purchasing a copy of the pattern, you are supporting my work.
The following links will help you navigate between sections of the pattern easily:
Materials
For this Tutorial, you will need
Yarn
Sirdar Jewelspun (100 % Acrylic, 547 Yards/500 Meters, 7.1 Ounces/200g Grams). Aran Weight. Colour: setting sun. 1 skein
You can use any Aran weight yarn that you have. You will need at least 547 yard or 550m. If you would like a longer shawl you will need additional yarn.
Hook
US L-11 / 8.00 mm.
(This is a recommendation based on the hook size I used for the sample shawl. Everyone crochets differently so if you need to use a larger or smaller hook, that's fine. You are aiming for a fabric that drapes well and has good stitch definition. If your stitches are too loose, you will need a smaller hook. Similarly, If the shawl feels stiff and doesn't drape nicely, try a larger hook.)
Notions: A Yarn Needle, Scissors, Measuring Tape and 3 stitch markers
Gauge
10 Stitches = 4”/10cm, 8 Rows = 4"/10cm
(Gauge is important to ensure that fitted items like sweaters fit as expected. It isn't vital for blankets and shawls.)
Sizes
One size approximately 60 cm long x 150cm wide. The size can be customised by working more or fewer repeats

Stitch Key (US Terminology)
ch(s) = chain(s)
Bring yarn over the hook from the back to the front and grab it with the hook.
Draw the yarn through the slip knot and onto the hook where it will form a loop.
Repeat 2 and 3 until you have the desired number of chains
dc = double crochet
Wrap the yarn over the hook from the back to the front
Insert the hook into the specified stitch or chain-space
Yarn over the hook from back to front and pull through the stitch. You should have 3 loops on the hook.
Yarn over the hook from back to front and pull through the first two loops. You should have 2 loops on the hook
Yarn over the hook from back to front and pull through the remaining two loops on the hook
sl st = slip Stitches
Insert hook into specified stitch or chain space.
Yarn over the hook from back to front and pull through the stitch. You should have 2 loops on the hook.
Pull the loop you just made through the loop that was already on the hook
st(s) = stitch(es)
Specialty Stitch & Technique Key
DC between stitches
The double crochet stitches in this pattern are worked into the space between the stitches from the preceding row.
Worked in rows
You will work to the last stitch then turn your work and work back in the opposite direction
Top-down construction
The pattern is worked top down from a small ring and you will work increases to form the triangular shape.
Single row repeat
The single-row repeat is worked until the shawl is the right size or until you run out of yarn
Foundation ring
At the start of this pattern, you will make a chain and join ends with a slip stitch to form a circle. The first row of stitches will be worked into the centre of this ring.
Chain space
The area beneath a chain. When you are told to work into the chain space, insert the hook into this space and not into the actual chain stitches.
Turning chain.
The chain stitches you work at the start of a row before or after turning your work. This chain brings the working yarn up to the height of the first stitch, In this pattern, the turning chain counts as a stitch. Always check your pattern notes as turning chains aren't always counted
Photo Tutorial
Form foundation ring
Chain 4,

Insert the hook into the furthest chain from the hook

The needle shows the furthest chain from the hook. This is where you will insert your hook

With the hook through that chain, it will look like you have two loops on your hook

Grab the yarn with the hook and pull it through both loops

You have worked a slip stitch and joined the ends of the chain to form a loop,
(Note: The next row will be worked into the centre of this ring. You may need to pull the chains slightly to open the ring up.)
Setup
Row 1 (Right Side) Chain 3
(Note: This is the starting chain for the row. It is the same height as a double crochet stitch and we count it as the 1st double crochet)

Work 2 double crochet into the centre of the foundation ring, Chain 2, then work 3 more double crochets into the same space.
[Count your stitches - you should now have 3dc, 2ch 3dc]
As this is a beginner's tutorial, I have included step-by-step photographic instructions on how to make a double crochet. If you wish, you can skip to straight to row 2 by clicking here.
How to make a double crochet
To work a double crochet, wrap the yarn around the hook by taking the hook under the working yarn, up and over as shown in the photo

insert the hook into the centre of the ring you just made

Wrap the yarn around the hook again

Draw up a loop. You will have 3 loops on the hook.
Wrap the yarn over the hook again and draw this loop through the first two loops on your hook.

Two loops remain on the hook.

Wrap the hook again and draw the loop through the remaining two loops on the hook

Row 2: chain 3 and turn your work.
Work 2 double crochets into the space between the turning chain and the next double crochet in the previous row, then work one double crochet into each space between stitches to the chain2 space.

Work 2 double crochets into the chain space, chain 2 and work 2 more double crochets into the same chain space.
(Note: In patterns, this will often be written in ( ) for example (2dc, ch2, 2dc). When you see this it means you should work all of the stitches that are between the ( ) into the same stitch or chain space. The chain space in this pattern forms that point of the triangle shawl)

Work one dc in each space between stitches to the last two stitches, skip the next double crochet (dc) and work 2 double crochet into the last space between stitches, work 1 double crochet into the turning chain from the last row. [You've just increased the stitch count by 6 stitches]


Row 3 Repeat row 2 until the shawl is the desired length
Finishing
Fasten off, and sew in the ends.
The Woodland Shawl pattern
©Amanda Phillips - Rainbow Rose Yarn Crafts

This is a very easy, beginner-friendly shawl pattern that works up quickly in Aran weight yarn. It uses double crochet stitches in a simple, easy-to-remember one-row repeat.
Materials
Sirdar Jewelspun (100 % Acrylic, 547 Yards/500 Meters, 7.1 Ounces/200g Grams). Aran Weight
Colour: setting sun 1 skein
Note: If you would like a longer shawl you will need additional yarn.
You can substitute any Aran weight yarn
Hook: US L-11 / 8.00 mm
Yarn Needle, Scissors, Measuring Tape, 3 stitch markers
Gauge
10 Stitches = 4”, 8 Rows = 4”
Sizes

One size 60 cm long, 150cm wide
Customisable by working more or fewer repeats
Stitch Key (US Terminology)
ch(s) = chains
dc = double crochet
sl st = slip Stitches
st(s) = stitch(es)
Specialty Stitch & Technique Key
The double crochet stitches in this pattern are worked between the stitches from the preceding row.
Notes
The pattern is worked top down. The increases form the triangular shape.
The single-row repeat can be worked until the shawl is the right size or until you run out of yarn
Pattern Instructions
The pattern is worked in rows
Form foundation loop
Chain 4, Join to the furthest chain from the hook with a slip stitch to form a loop,
Setup
Row 1 (Right Side): Ch3 (Note: Ch3 counts as 1st dc), Work (2dc into the centre of foundation loop, chain 2, 3dc into the centre of foundation loop. [You now have 3 dc, 2 ch 3 dc]
Row 2: ch3, turn, work 2dc into the space between the turning chain and next dc in the row below, 1dc into each space between stitches to the ch2 space, (2dc, ch2, 2dc) into the chain space, 1 dc into each space between stitches to the last two stitches, skip next dc, 2dc between skipped dc and the last dc, dc into top of the turning chain from last row. [increased 6 stitches]
Repeat row 2 until the shawl is the desired length
Finishing
Fasten off, and sew in ends.
Comments